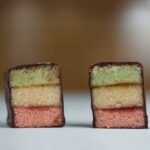
No Almond Rainbow Cookies
Italian Rainbow Cookies made without almond paste
Servings 48
Cost 5
Ingredients
- ⅔ cup macadamia nuts ready to eat, unsalted
- ⅔ cup confectioners' sugar (80 grams)
- 1 large egg white
- 4 large eggs
- 1 cup granulated sugar (200 grams)
- 8 oz butter, melted and cooled (I used unsalted but I think salted would be fine) (228 grams)
- 1 ½ teaspoons vanilla extract
- 1 cup all-purpose flour (127 grams)
- ½ tsp. salt
- 6-8 drops red food coloring paste
- 6-8 drops green food coloring paste
- ¼ cup seedless raspberry preserves
- ¼ cup apricot preserves
- 6 oz unsalted butter (170 grams)
- 12 oz chocolate 60%
Instructions
- Preheat oven to 375F and line three 9 inch square metal pans with non-stick foil. If you only have one or two pans, just use what you have and bake each layer separately. The batter can stand for a few minutes.
- Place the nuts in a food processor; cover and process until ground. Add the confectioners' sugar and egg white; cover and process until blended.
- In a large bowl, beat eggs and sugar on high speed for 2-3 minutes or until thick and lemon-colored. Gradually beat in ground nut mixture, then melted butter, vanilla and salt. Add the flour and stir by hand until it is mixed in. You should have about 33 oz of batter by weight.
- Divide batter into thirds – if you have a scale, each portion should weigh 11 oz. Stir red food coloring into one portion of batter; stir green food coloring into another portion. Leave remaining batter plain (or add a little yellow).
- Bake for 12 minutes or until a toothpick inserted near the center comes out clean and edges begin to brown. Cool for 10 minutes before removing from pans to wire racks to cool completely.
- Place red layer on a large sheet of cling wrap and spread with raspberry preserves. Top with plain layer, then spread plain layer with apricot preserves. Add green layer; press down gently. Wrap the cooled stack of cakes in cling wrap and put in the freezer for a few hours or until frozen. You can keep the cakes frozen for up to a month if you wrap them tightly.
- When ready to dip, trim the left and right sides of the square with a chef’s knife. Leave the top and bottom sides raggedy. Cut the square in half horizontally, then cut each half into 6 rectangles so that you have 12 rectangles about equal size with raggedy ends. For wider bars, cut 10 rectangles.
- Put all your frozen cake sticks back in the pan and store them in the freezer while you prepare the dipping chocolate.
- Have ready a parchment covered baking sheet and a little extra room in the refrigerator.
- Melt 3 oz of butter (6 tablespoons) of butter in a microwave-safe bowl. Add 6 oz of semi-sweet or 60% cacao chocolate. Stir well, then microwave at 50% power stirring at 30 second intervals until your chocolate is shiny and thin.
- Remove the frozen cake sticks from the freezer and holding by a raggedy end, dip as far as you can into the chocolate, letting it fall back into the bowl. Set the dipped stick on the parchment. Do this until all your chocolate is gone, then repeat melting procedure by melting butter, adding more chocolate etc. Continue until all your sticks are dipped. Chill until set.
- Before serving, pull the sticks from the refrigerator. Trim the raggedy ends and cut each stick into about 3 nice cubes.