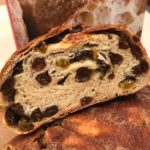
Milanese Raisin Bread
Also known as Pan Travmai o Pane all’Uva
Servings 12
Cost 5
Ingredients
- 1 ½ cups raisins, mix of Dark and Golden (250 grams)
- Water for covering raiains
- 2 cups bread flour or however much to make 250 grams** (250 grams)
- ¾ teaspoon salt
- ½ tablespoon sugar (6 grams)
- ¾ teaspoon non-diastatic malt powder
- 2 teaspoons of Platinum or Rapid Rise instant yeast
- 1 teaspoon unsalted butter, soft or room temperature
- 1 ½ tablespoons extra flour for the raisins
Instructions
- Put the raisins in a large bowl and cover with water. Carole Field recommends covering dark raisins with cool water and golden raisins with warm. Let raisins soak for 1 ½ hours, then drain and reserve raisin flavored water. When you cover the raisins, keep in mind you’ll need ⅔ cup of the raisin water.
- After the raisins have soaked, drain and reserve ⅔ cup of the raisin water. Heat the water to around 120 degrees. It can be slightly higher (up to 125) if you are using Platinum or Rapid Rise yeast. Lower for active dry.
- Mix only 1 ½ cups of the flour (about 200 grams), salt, malt powder, sugar and yeast in the bowl of a stand mixer. Add the warm raisin water and stir. I recommend doing this by hand with your favorite mixing tool such as a heavy duty scraper. This will give you a feel for the dough. At this point it should be light and sticky.
- Put the dough on the mixer stand and let the dough hook knead. It should still be clinging to the sides of the bowl at this point. Start adding the remaining flour a couple of tablespoons at a time, kneading and stopping to scrape side of the bowl. You should end up using all 250 grams of the flour. Continue kneading until the dough is smooth and elastic and no longer clings to the side of the bowl.
- Transfer it to a well-oiled bowl and turn to cover. Cover and let rise until it’s almost double in bulk – about 1 hour. If you are using active dry, it will take longer.
- After dough has risen, turn it onto a lightly floured surface. Without punching the dough down too hard or kneading it, pat it gently with your palms into a very imperfect (almost oval) rectangle somewhere around 8 inches wide. Pat the raisins dry and toss with the reserved flour.
- You will add the raisins to the dough in 3 additions. Put ⅓ of the raisins on top of the dough. Fold the dough up and over the raisins and pinch it to seal them in. Pat dough down again and repeat with half the remaining raisins, bring dough up and around and sealing. Cover the dough with a greased piece of plastic wrap and let it rest for about 5 minutes before you add the last round of raisins.
- Now you will add the rest of the raisins and shape the loaf. Press the dough down flat into a slightly rectangular shape. Scatter on the last of the raisins. Starting on the long sides, roll the dough up into a cylinder and seal the edges by pinching. Try to lock in all the raisins, but if some fall out that is okay. Try to make your loaf as even as possible.
- Place loaf on a parchment lined baking sheet. Cover with greased plastic wrap and let rise for about 45 minutes. It should be puffed not quite doubled. Gently roll sheet back and forth to help shape loaf during baking (I actually did this gently with my hands).
- While the bread is rising, go ahead and preheat the oven to 450 degrees.
- Bake for 5 minutes at 450, then reduce heat to 400 and bake 30-40 minutes longer (check at 30 if you are baking smaller loaves). Let cool completely on a rack.
Notes
- If using active dry yeast, heat the water to only 115 degrees and add the yeast to the water to dissolve it. Rise times will be about 1 ½ to 2 hours for the first rise and 1 hour for the second.