
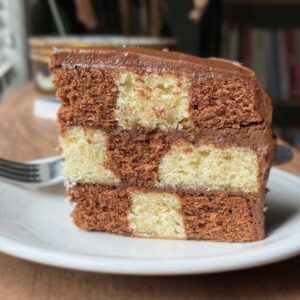
Yesterday was less than great and I needed a distraction. Many thanks to this old recipe! It's a chocolate frosted checkerboard cake recipe I originally tried back in 2011. My pictures sure weren't the best, but at the time I was quite proud of them and the cake. But mostly, I loved the fact that this recipe does not require a special pan.

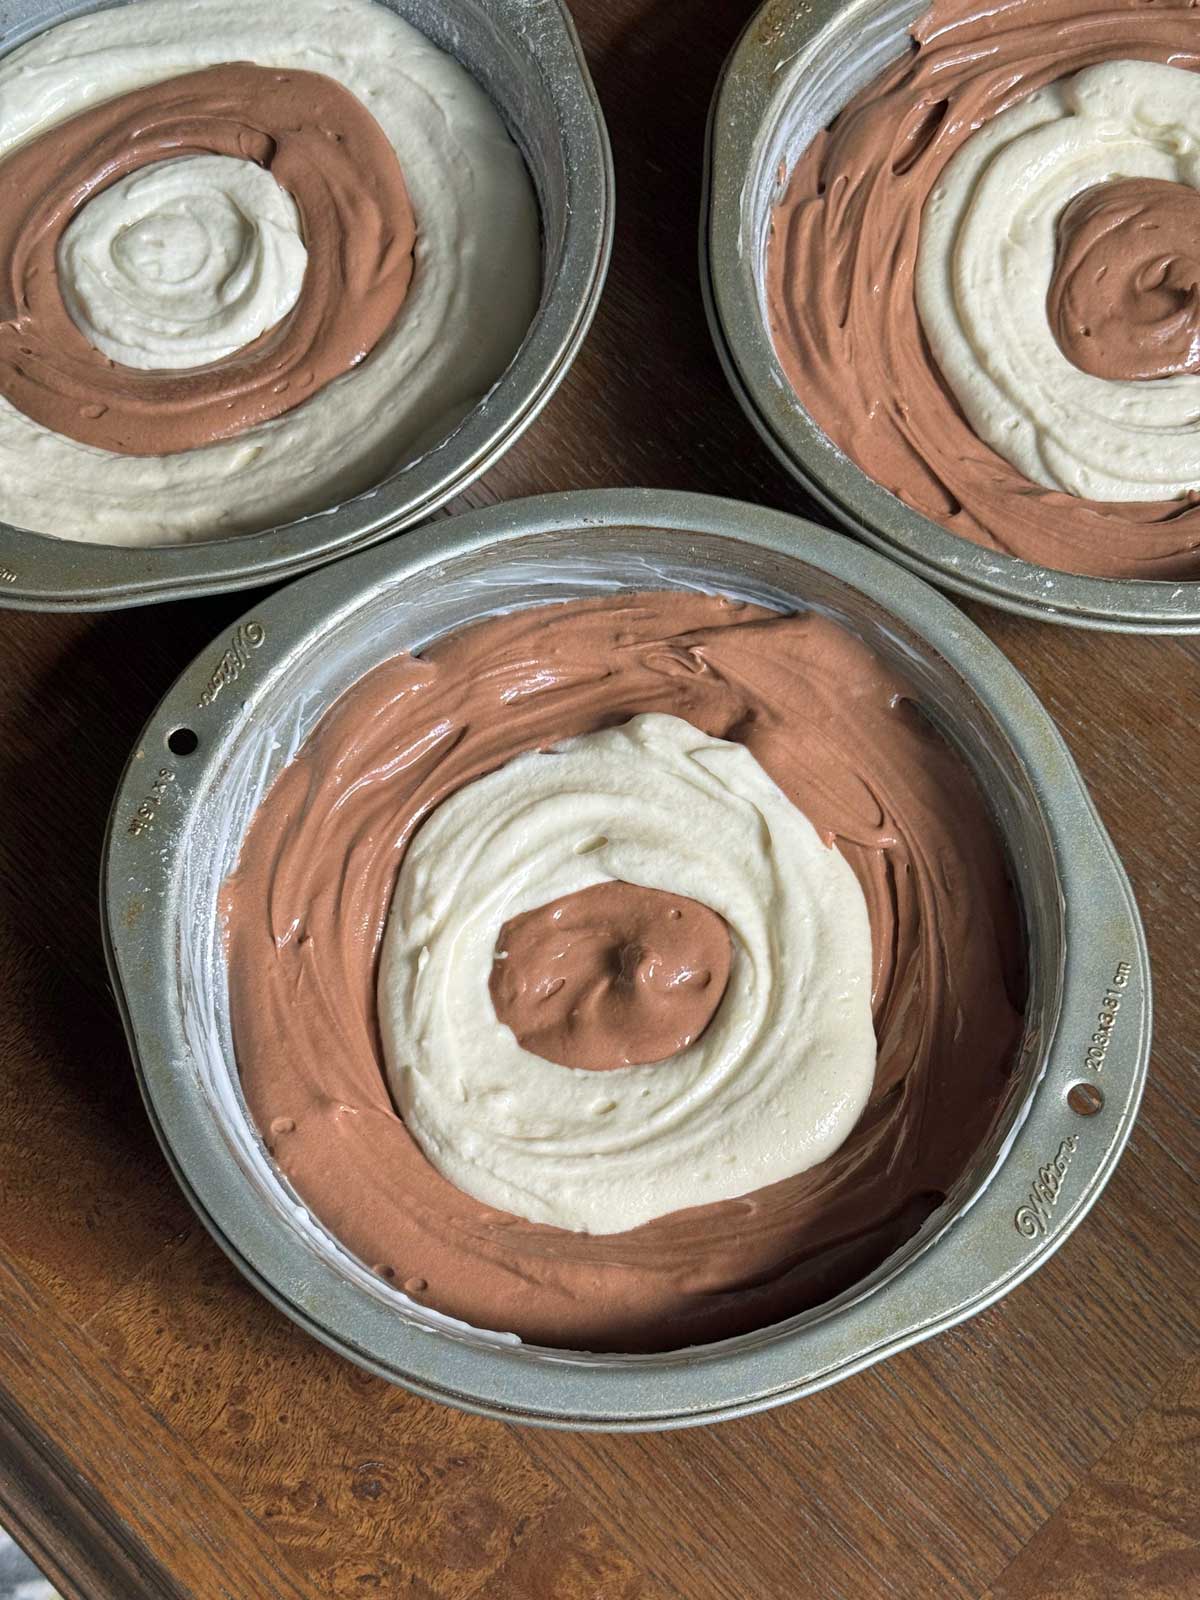
Piping Layers For Checkerboard Pattern
For this checkerboard cake recipe, you make one vanilla batter, then add melted chocolate to half of it. To make the checkerboard pattern you pipe concentric circles into three 8-inch pans and stack. While not perfectly symmetrical, this makes a very respectable checkerboard pattern.

Here's what yesterday's piping looked like. I was skeptical as to whether this would look like a checkerboard when stacked, but it sure does.
Ghirardelli Cocoa Bag Frosting
I baked this cake at 4:00 in the afternoon, so by the time it was finished I needed to start thinking about dinner and didn't feel like melting more chocolate for the original icing. I changed it to an easy chocolate buttercream adapted from the back of the Ghirardelli bag. Here's the original if you'd like to see it, but I went freestyle, increasing the amount and using a little cream along with the milk. This was just enough frosting for the cake, and I found it to be chocolaty rather than super buttery like some
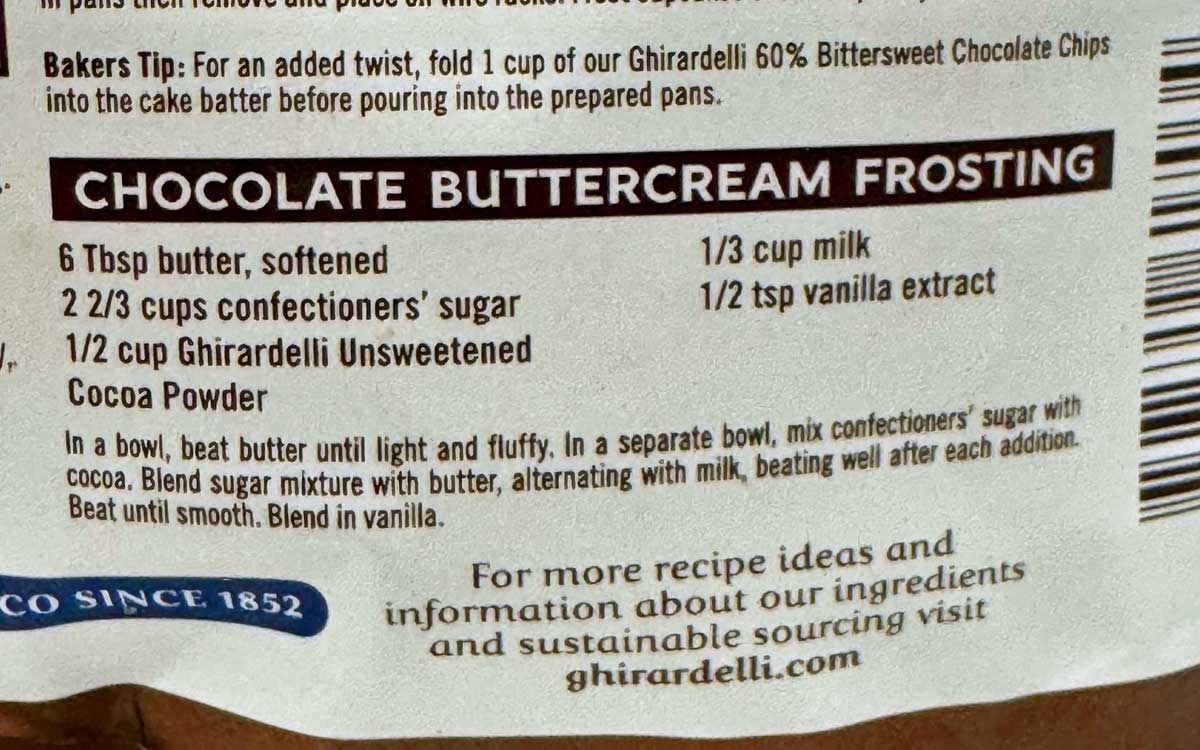
If you plan on decorating it more elaborately, you might want to double the recipe.
Cake Baking Tips
- When baking scratch cakes like this, you have to be mindful and carefully measure everything. Use a scale for the best results!
- Bring all of the ingredients to room temperature before starting.
- If you happen to have a large microwave-safe mixing bowl, melt the chocolate directly in that mixing bowl, then scrape 16 or 17 oz of vanilla batter directly into the mixing bowl with the chocolate. This just saves a bowl.
- For piping, you'll need two large pastry bags with wide round tips. If you don't have pastry bags, use heavy duty freezer bags and snip off the corners. But get yourself some pastry bags! The disposable ones come in handy for so many things. I have a draw with various size rolls.
Recipe
Checkerboard Cake
Equipment
- 3 8-inch pans
- 2 large pastry bags
- 2 round tips
Ingredients
- 2 ¼ cups cake flour (255 grams)
- 2 teaspoons baking powder
- ½ teaspoon salt
- 1 ½ sticks salted butter, softened (170 grams)
- 1 ½ cups granulated sugar (300 grams)
- 3 large eggs, bring to room temperature
- 2 teaspoons vanilla
- ¾ cup plus 1 tablespoon milk, room temperature (180 grams)
- 2 oz melted semi-sweet chocolate (56 grams)
- 1 oz unsweetened chocolate, melted (28 grams)
Frosting
- 1 stick butter, softened and cut into chunks (114 grams)
- 3 cups confectioners' sugar, plus more if you'd like (330 grams)
- ½ cup plus 2 tablespoons unsweetened natural cocoa powder (50 grams)
- 1 teaspoon vanilla extract
- ⅛ teaspoon salt
- ⅓ cup whole milk OR mix about 3 tablespoons milk with 2 tablespoons of cream
Instructions
- Preheat oven to 350 degrees F. Grease 3 8-inch round cake pans. Line with parchment circles (if you want) then grease and flour again.
- Also, prep your piping bags. If using zipper bags, make sure they are the heavy duty ones and snip off the tip at about ½ inch. If using piping bags, fit them with ½ or larger tips.
- Whisk together flour, baking powder and salt; set aside.
- Cream the butter and sugar in bowl of a stand mixer using paddle attachment. Beat in the vanilla.
- Add eggs one at a time, beating well after each addition. Scrape side of bowl often.
- By hand or using lowest speed of mixer, beat in the flour and ¾ cup milk (reserve the 1 T.) alternately, beginning and ending with the flour mixture.
- Divide batter in half. The best way is with a scale. If you have a scale, set a second bowl on it, set tare to zero and weigh out about 17 oz which is about half the batter.
- Stir the melted chocolate into half the batter along with the reserved 1 tablespoon milk.
- Divide batter evenly between 2 decorating bags.
- Pipe the batter into the pans in this order. Start with the chocolate batter and pipe a circle of chocolate around the edge of one pan. Pipe a ring of vanilla inside the chocolate. Pipe a circle of chocolate in the middle. Repeat with the second pan. For the third pan, pipe the vanilla around the edge, add a circle of chocolate and a middle circle of vanilla.
- Bake pans on center and lower racks, staggered, for 20 to 25 minutes or until a toothpick inserted in cakes comes out clean. Let cool in pan set on a rack for 10 minutes. Remove from pans and peel off parchment. Cool completely.
Frosting
- Take the time to sift the powdered sugar and cocoa powder if lumpy.
- In a mixing bowl, using an electric mixer, beat the butter until light and fluffy.
- Add half of the sugar and all of the cocoa powder and stir until it holds together, then beat until creamy.
- Add vanilla, salt and remaining sugar and beat until blended, then gradually (1 tablespoon at a time) add your whole milk or cream mixture, beating and scraping the sides of the bowl until icing is smooth.
Assembling
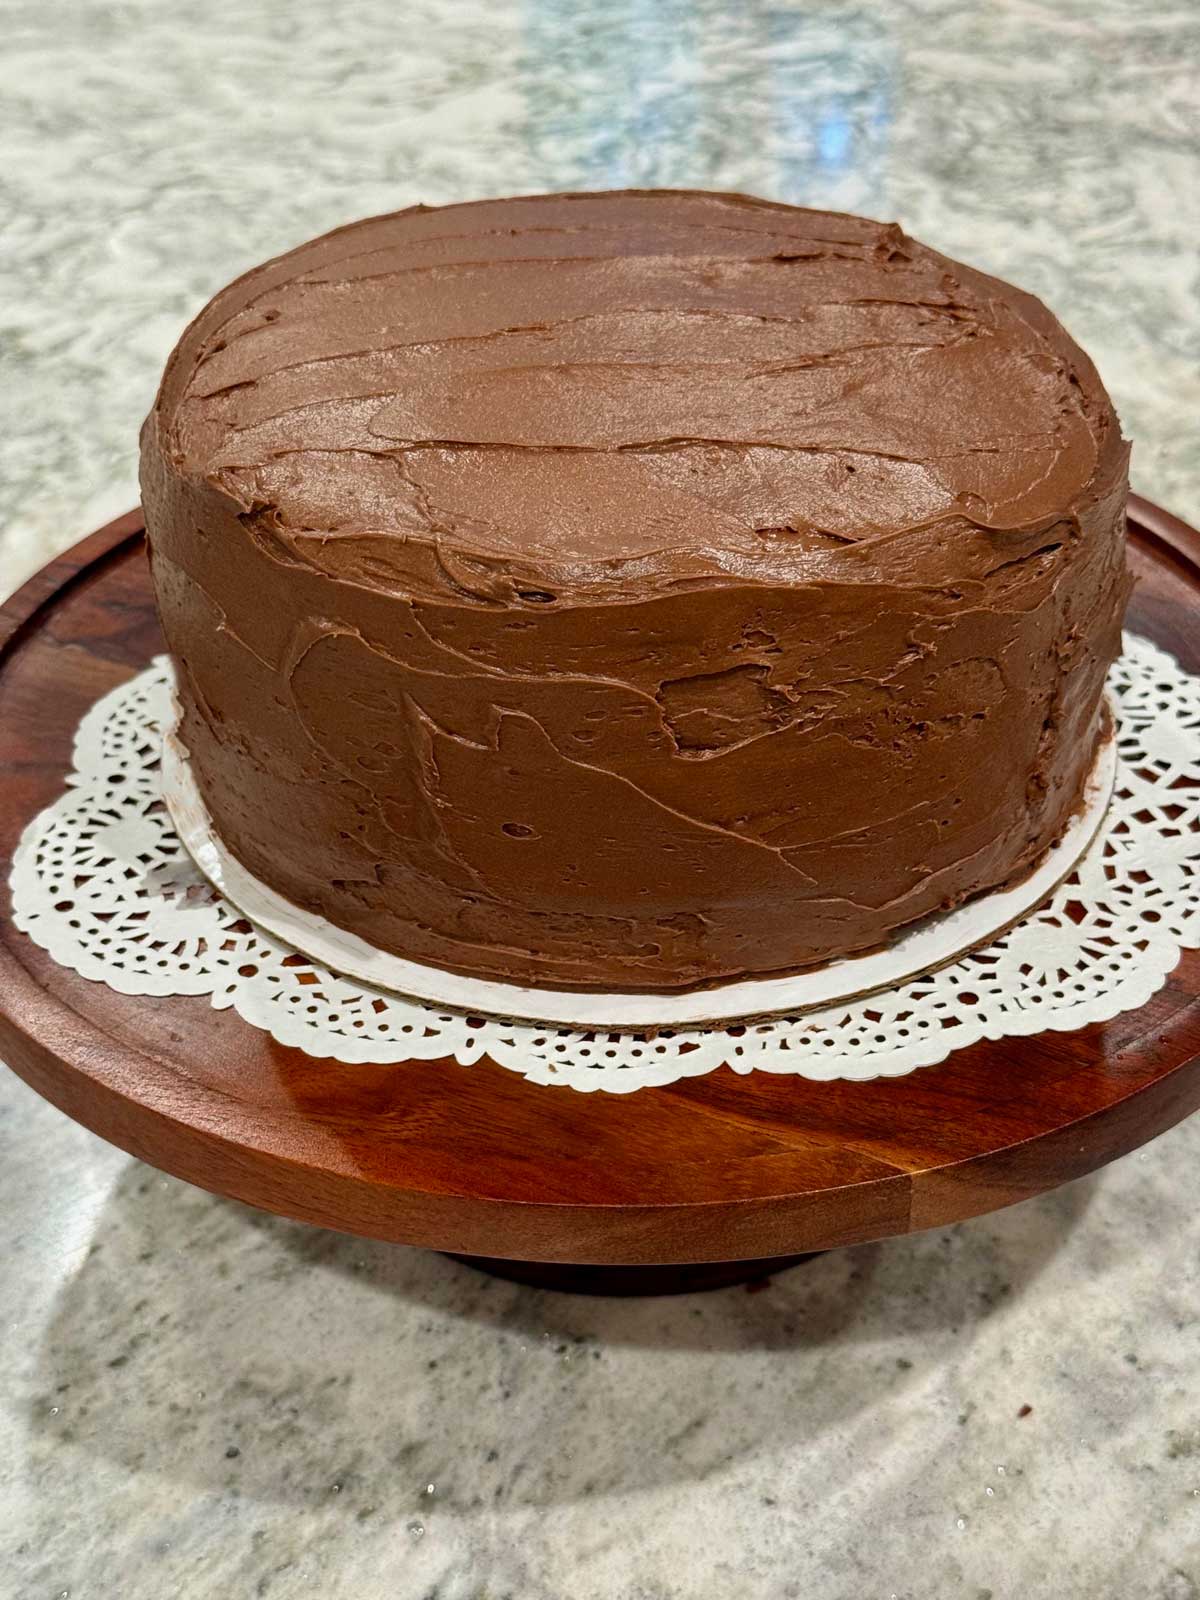
- To assemble the cake, start with a chocolate-vanilla-chocolate ringed layer. Spread with a thin coat of frosting, then stack on the vanilla-chocolate-vanilla layer. Spread that with frosting, then add the other chocolate-vanilla-chocolate layer. Spread frosting all over the cake
Anna says
Yeah, I like that this recipe works in regular 8-inch pans. I considered baking the cakes first and cutting rings as suggested earlier in the comments, but figured I'd make a mess. The piping method worked so well! Most importantly, thank you so much for being one of my baking buddies for so long. It really means a lot, and I appreciate you and everyone who follows along with the madness.
Darlene says
LOL Glad I checked to see if I commented earlier because I was going to write the same thing I did 14 years ago! Ingenious method to save us from purchasing another set of pans that would be used infrequently.
Karen Harris says
This is such an adorable cake. A few years ago a friend of mine made one of these for her son's birthday to rave reviews. Next time I feel creative, I'm making this recipe.
Molly says
Pretty! The cake is very festive. I like it 🙂
Chi says
I'm with Helena, that is how I've made it before- baked three whole cakes and cut them into rings later. It means that the layers are much more even, as you can cut them the right size once everything is cooked.
Amanda says
Anna, I have one of those pans and find that a "from scratch" recipe tends to work better than cake mix. I've made both and did a comparison on my blog. Megan's Cookin' also has a tutorial for not using a pan, however she just bakes two separate colors, then cuts the pieces and puts them together like a puzzle 🙂
Rebecca says
When I was a kid, my mom used to make checkerboard cakes using foil rings to separate the batter while she was spooning it in. I haven't thought about that in years!
Pam Shank says
Well this is so cool Anna. You make this look like a really cool way to do it and I will try this for sure. Would be cute mixing colors for different holidays. Thanks
Ginny says
You could maybe use a peach can & a tomato paste can with the bottoms cut out for each layer; just pull them out to make each of the next layers. Makes me wanna make one! ;o)
Helena says
I love cakes that look really difficult but then aren't. I've made checkerboard cake before, but my method was actually a bit easier. I just made 2 pans of chocolate cake and 1 pan of vanilla cake and then cut out three rings out of each (same sizes). Switch the middle layer, assemble, frost, done. I hope you understand what I'm trying to say, because it was real easy and you don't have to deal with any of that piping mess. And I've never even seen special checkerboard cake pans.
Louise says
Years ago at cake decorating class, I learned to make pastry bags from parchment paper and I've been doing that ever since. They work just as well, and then you get to throw the mess away without having to wash anything. 🙂
Amy @ What Jew Wanna Eat says
What a cool cake! I would like to try this with different colored batter for a theme party!
Anna says
Taneka, I was wondering how those pans worked. Based on your experience, doing it by hand is the way to go. Despite the fact I had to use two pastry bags, the recipe was really pretty easy.
T. Martin says
And coming from someone who actually owns the specialized pans the whole thing is kind of a pain, based on my one experience. Likely at the time I wasn't patient and careful enough and my frosting skills and general baking knowledge were less developed thus I never got as far as you did but this post has inspired me to maybe try it again.
Anna says
I tried to take a video of myself making the rings with pastry bags, but my hands look like the crypt keeper's so I didn't post it. I ended up doing some of the rings with the pastry bag and some of the outer rings I just did with a spoon.
Sue says
I can see why your family was impressed!! Nicely done!
Caroline says
It looks delicious! I'd gladly take a slice of that! I'm sure my rings wouldn't turn out nearly as successful as these did - congrats!
Stacie @ Imperfectly Healthy says
I remember seeing this done on Cake Boss, but seeing you do it makes me think I could do it too!
Katrina says
It certainly does look great!
Darlene says
Brilliant! I don't like buying and storing baking accessories that can only be used for one purpose, and now we can make this with what we already have. Can't wait to give this recipe a try. Thanks for showing us this neat trick.
Tracy says
Wow, that looks great! Yum!
Susan (Plum Texan) says
Nicely done! I was reading through and thought of something, if you wanted to be more uniform and still go without the pan. What about using a couple of empty cans, different sizes, to pour batter into for your smaller rings?